Introduction :
Welcome to a delightful journey into the world of the Easy Strawberry Jello Flag Cake! This vibrant dessert is not just a treat for the taste buds but also a feast for the eyes, perfect for summer gatherings and celebrations. In this article, we’ll explore the origins of this cake, share a personal story that highlights its charm, and guide you through the steps to create your own masterpiece. With a blend of fresh strawberries, blueberries, and a light whipped cream topping, this cake embodies the spirit of fun and festivity. Let’s dive into the delicious details!
The Story & Intro :
Growing up in Austin, Texas, I have fond memories of summer barbecues where desserts took center stage. One cake that always stood out was the Easy Strawberry Jello Flag Cake. I remember my aunt, with her infectious laughter, whipping up this colorful treat for our Fourth of July celebrations. The way she layered the strawberries and blueberries to create a flag design was nothing short of magical. It wasn’t just about the cake; it was about the joy of gathering with family, sharing stories, and indulging in something sweet.
As I began my culinary journey, I realized that cooking is more than just following recipes; it’s about creating memories. The Easy Strawberry Jello Flag Cake became a staple in my kitchen, reminding me of those carefree summer days. It’s a cake that invites everyone to join in, whether you’re a seasoned baker or a novice in the kitchen. The beauty of this cake lies in its simplicity and the joy it brings to any gathering.
In this article, we’ll explore how to make this delightful cake, ensuring that you can recreate those cherished memories in your own home. So, roll up your sleeves, gather your ingredients, and let’s get started on this delicious adventure!
PART 1: Crafting the Perfect Base for Your Easy Strawberry Jello Flag Cake

To create a stunning Easy Strawberry Jello Flag Cake, you need a solid foundation. The base of this cake is a moist vanilla cake that pairs perfectly with the fruity flavors of the Jello and fresh berries.
- Choosing the Right Cake Mix
Start with a quality vanilla cake mix. This will save you time and ensure a consistent texture. Follow the package instructions closely, mixing in water, eggs, and canola oil. The key is to blend until smooth, avoiding overmixing, which can lead to a dense cake. - Baking to Perfection
Pour the batter into a greased 9×13 cake pan and bake according to the package directions. Once baked, allow the cake to cool for about 15 to 20 minutes. This cooling period is crucial as it helps the cake set, making it easier to poke holes for the Jello mixture later.
PART 2: Infusing Flavor with Strawberry Jello
The next step in creating your Easy Strawberry Jello Flag Cake is to infuse it with the vibrant flavors of strawberry Jello. This not only adds sweetness but also creates a beautiful marbled effect.
- Preparing the Jello Mixture
In a separate bowl, mix the strawberry Jello powder with boiling water. Stir until fully dissolved, then add cold water to cool it down. This step is essential for ensuring that the Jello sets properly within the cake. - Creating the Signature Holes
Once the cake has cooled, use a fork to poke holes all over the top. This allows the Jello mixture to seep into the cake, creating a moist and flavorful dessert. Slowly pour the Jello mixture over the cake, ensuring it fills the holes evenly. Let the cake cool completely to allow the flavors to meld.
PART 3: The Whipped Cream Topping

No Easy Strawberry Jello Flag Cake is complete without a fluffy whipped cream topping. This layer adds a lightness that balances the sweetness of the Jello and cake.
- Whipping Up the Cream
Use a hand mixer or stand mixer to whip the cream until soft peaks form. This process should be done carefully to avoid over-whipping, which can turn the cream into butter. Spread the whipped cream evenly over the cooled cake, creating a smooth and inviting surface. - Decorating with Berries
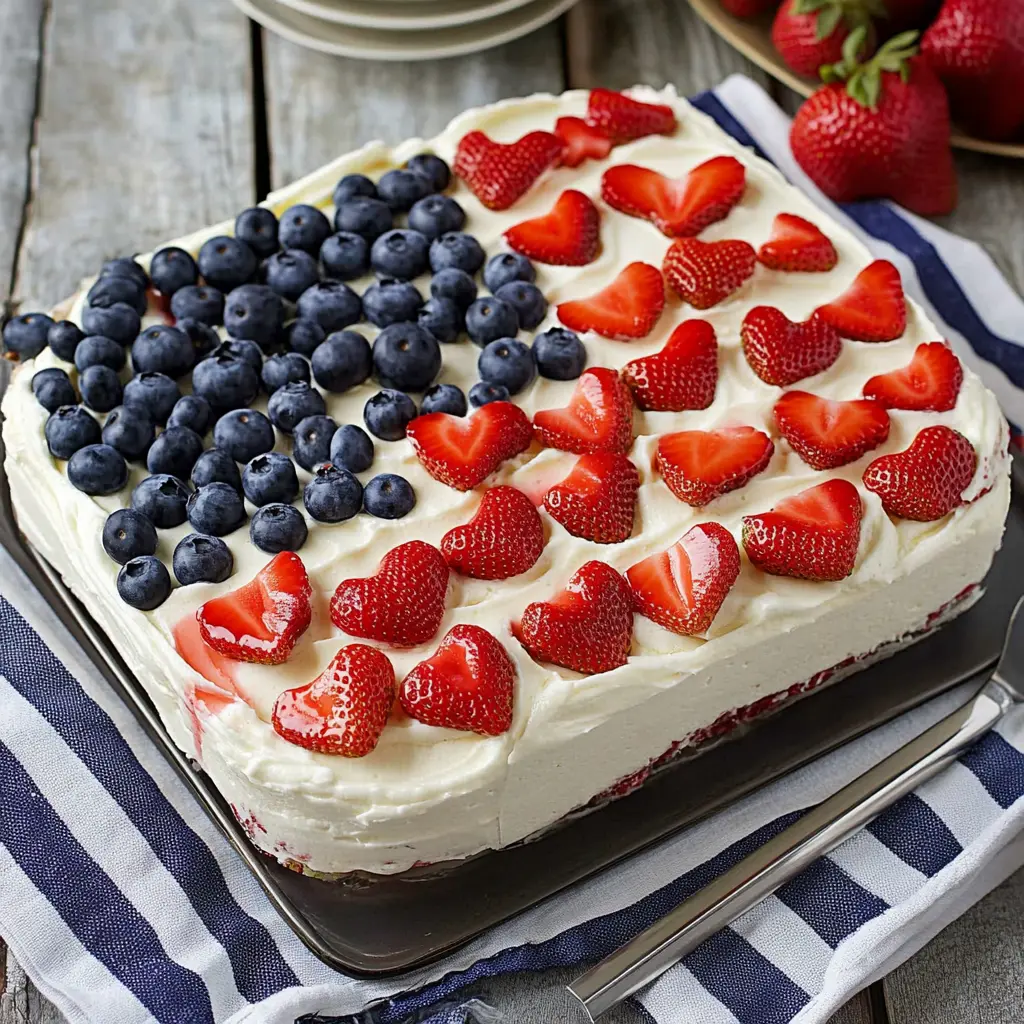
Now comes the fun part—decorating! Arrange rows of blueberries on the top left corner to represent the stars of the flag. Slice the strawberries lengthwise and create rows to form the red stripes. This not only makes the cake visually appealing but also adds fresh fruit flavors that complement the Jello.
PART 4: Serving and Storing Your Cake

After all the hard work, it’s time to serve your Easy Strawberry Jello Flag Cake. This dessert is perfect for summer gatherings, picnics, or any festive occasion.
- Chilling Before Serving
Cover the cake and chill it in the refrigerator for 3 to 4 hours before serving. This allows the Jello to set completely and the flavors to meld beautifully. The chilled cake is refreshing and perfect for hot summer days. - Storage Tips
If you have leftovers, store the cake in the refrigerator, covered. It should keep well for 2 to 3 days. Just be cautious when serving, as the whipped cream can be delicate. Enjoy the cake with friends and family, sharing the joy it brings just like my aunt did all those years ago.
FAQs :
- Can I use a gluten-free cake mix for the Easy Strawberry Jello Flag Cake?
Yes, you can substitute a gluten-free cake mix. Just be aware that the other ingredients may vary based on the mix you choose. - How long can I store the cake?
The cake can be stored in the refrigerator for 2 to 3 days. Make sure to cover it to keep it fresh. - Can I use other flavors of Jello?
Absolutely! While strawberry is traditional, feel free to experiment with other flavors to create your own unique version. - What’s the best way to serve the cake?
Serve the cake chilled, and consider pairing it with additional fresh berries or a scoop of vanilla ice cream for an extra treat.
Conclusion :
The Easy Strawberry Jello Flag Cake is more than just a dessert; it’s a celebration of flavors, memories, and togetherness. With its vibrant colors and delightful taste, it’s sure to be a hit at any gathering. So, gather your loved ones, whip up this cake, and create your own cherished memories around the table. Happy baking!
Print
Easy Strawberry Jello Flag Cake: A Festive Delight for Summer Celebrations
- Total Time: 50 minutes
- Yield: 12 servings 1x
- Diet: Vegetarian
Description
A festive, easy-to-make flag cake with moist vanilla cake, strawberry Jello, whipped cream, and fresh berries. Perfect for summer gatherings and patriotic holidays.
Ingredients
- 16.5 ounces vanilla cake mix
- 1 cup water
- 3 large eggs
- 1/3 cup canola oil
- 1 cup boiling water
- 3 ounces strawberry Jello mix
- 1/2 cup cold water
- 8 ounces whipped cream
- 1 pint blueberries
- 1 1/2 quarts strawberries
Instructions
- 1. Gather ingredients, and prep berries by washing and drying.
- 2. Mix together the cake mix, water, canola oil, and eggs, and mix it according to package directions.
- 3. Then pour the cake batter into a greased 9×13 cake pan, and bake according to package directions.
- 4. After baking, allow the cake to cool for about 15 to 20 minutes.
- 5. Meanwhile, mix the Jello mix with boiling water.
- 6. Then add the cold water, continuing to mix well, until the Jello mix is fully dissolved.
- 7. Poke the top of your cake all over with a fork, creating small holes all over the top of the cake.
- 8. Slowly pour the Jello mixture over the entire cake, and allow the cake to finish cooling.
- 9. Using a spatula, spread whipped cream evenly over the entire cake.
- 10. Add 5 or more rows of blueberries to the top left corner of the cake.
- 11. Stem and slice the strawberries lengthwise; then add rows of strawberries to create the red stripes for your cake. I had enough room to add 4 rows of strawberries to my cake.
- 12. When you’re done decorating, cover and chill your Fourth of July cake for 3 to 4 hours before serving.
Notes
- Gluten-Free: You can use a gluten-free cake mix in place of a regular cake mix; just keep in mind cake batter ingredients may vary, depending on the cake mix you use.
- Careful when spreading the whipped cream on top of the cake: Some cake mix cakes are so light and fluffy, the top will easily crumble and spread with the whipped cream. Go easy with the spatula.
- Storage: Jello cake should keep for 2 to 3 days, but you’ll need to cover it and keep it in the refrigerator when not serving.
- Prep Time: 20 minutes
- Cook Time: 30 minutes
- Category: Dessert
- Method: Baking
- Cuisine: American
Nutrition
- Serving Size: 1 slice
- Calories: 267
- Sugar: 25g
- Sodium: 271mg
- Fat: 10g
- Saturated Fat: 3g
- Unsaturated Fat: 7g
- Trans Fat: 0g
- Carbohydrates: 41g
- Fiber: 2g
- Protein: 4g
- Cholesterol: 49mg